Chrome autofill settings explained: How to manage, edit, and protect your data


Chrome autofill saves time by filling in passwords, addresses, payment details, and more automatically. But that convenience works best when you know what’s being saved and how it’s used.
This guide explains where you can find Chrome autofill settings, how to turn features on or off, edit or remove saved data, clear everything when needed, and fix issues when autofill stops working.
What are Chrome autofill settings?
Chrome autofill is a built-in feature that automatically fills in certain saved data on web forms. When you fill out a form, Chrome may prompt you to save that information. If you do, the next time you visit a website with a form, autofill detects the field types and offers to fill them in for you.
Chrome autofill settings let you decide what Chrome can store and when it can fill that data into forms.
What data does autofill store?
Chrome autofill organizes data into distinct categories, each handling a specific type of information:
- Passwords: Username and password for websites.
- Payment methods: Credit and debit card details, including the card number, cardholder name, and expiration date.
- Addresses and contact info: Names, email addresses, phone numbers, and physical addresses.
Some desktop users also have access to Google’s new enhanced autofill. If enabled, it can fill in passport and driver's license numbers, vehicle information (like license plate or VIN), and more.
Key benefits of using autofill
The clearest advantage of autofill is that it saves time on repetitive form filling. It also reduces typos, especially in long or complex fields. If you're signed in to your Google Account and sync is enabled, Chrome can share your saved data across devices, so your information is available wherever you use Chrome.
Privacy and security considerations of autofill
Any feature that stores sensitive information, such as autofill, comes with trade-offs. If someone gains access to your unlocked device or a signed-in browser profile, they may be able to use autofill to access certain saved data, depending on the type of information and your device’s security settings.
There is also a broader risk tied to how autofill interacts with websites. In some cases, autofill may trigger on deceptive or lookalike pages, or on forms with hidden fields. This can result in data being filled into unintended fields or submitted to a site that is not what it appears to be. While most browsers include safeguards, these protections may not catch every scenario, so autofill could still trigger on unfamiliar pages.
Autofill in Google Chrome also involves limited data sharing to support the feature. When you interact with forms, Chrome may send information about the structure of the form and the types of fields being used. This doesn’t include the actual values you enter, but rather generalized or anonymized field information (such as “email” or “address”). This kind of data is used to improve how autofill recognizes and completes forms.
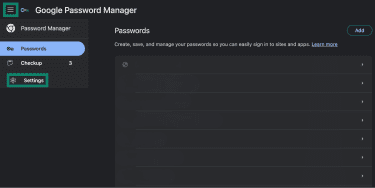
Where are the Chrome autofill settings?
Chrome autofill settings are located in the browser's main settings menu, on both desktop and mobile. This is where you can view, edit, and manage your saved autofill data.
How to find autofill settings on desktop
You can use Chrome’s Settings sidebar to go to the autofill controls tied to each data type.
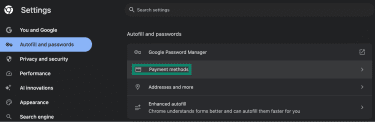
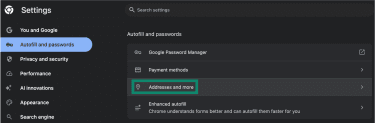
- Open Chrome on your computer, click the three-dot menu on the top right, then click Settings.
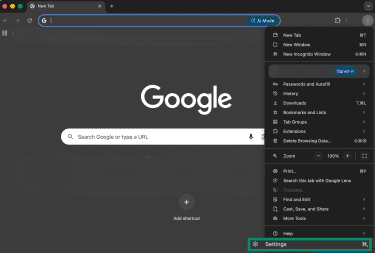
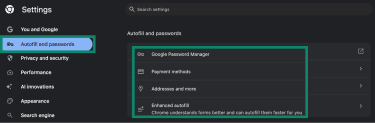
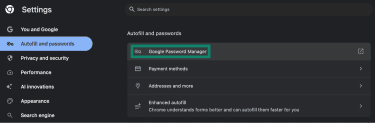
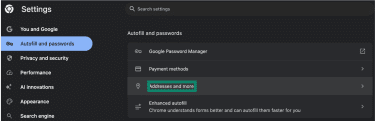
- In the sidebar, click Autofill and passwords. Here you’ll find the settings for Google Password Manager, Payment methods, Addresses and more, and Enhanced autofill (if available).
Alternatively, you can type “chrome://settings/autofill” directly into the address bar to jump to the autofill main menu.
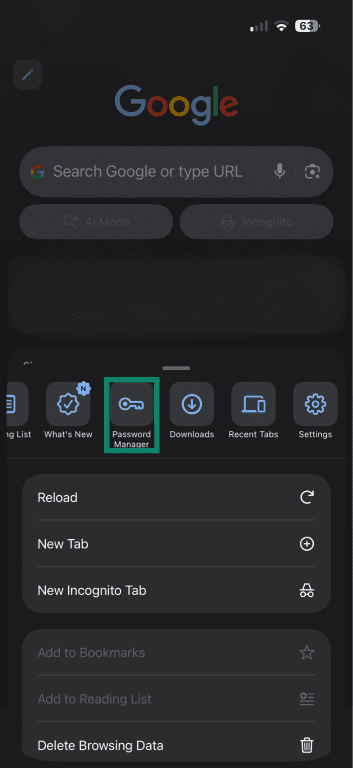
How to find autofill settings on mobile
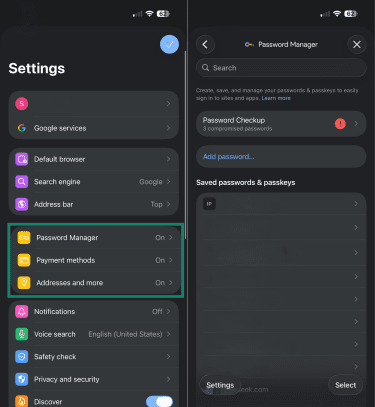
Chrome’s autofill settings are also in the main Settings menu on both iOS and Android. For the following guide, we’re using an iPhone to show the steps:
- Open the Chrome app on your device, tap the three horizontal dots on the bottom-right, then tap Settings.

- Tap Password Manager, Payment methods, or Addresses and More based on the data category. Tapping Passwords will take you to Google Password Manager, where you can see all your saved credentials.
How to turn on Chrome autofill
Chrome lets you control autofill separately for passwords, payment methods, and addresses. You need to enable each category individually.
How to enable autofill for passwords
With autofill, you can configure Google to save your passwords and passkeys and sign you in automatically. The steps are the same on desktop and Android.
- In Chrome’s Autofill and passwords section, click Google Password Manager to open it.
- Click the three horizontal lines on the top left and go to Settings.
- Toggle on Offer to save passwords and passkeys and Sign in automatically.
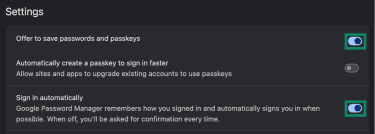
On iOS, the steps for getting to the Password Manager section are the same. The only difference is that there’s a Turn on Autofill button that you have to tap to turn on the feature. You can then tap the Offer to save passwords & passkeys toggle to enable it.
How to enable autofill for payment methods
Autofill for payment lets Chrome save card details and suggest them during checkout. The process is the same on desktop and mobile.
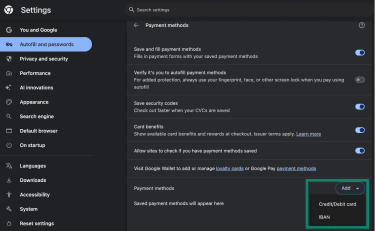
- In Chrome’s Autofill and passwords section, click Payment methods.
- On the next page, toggle on Save and fill payment methods. If you want to save your security codes, too, toggle the switch next to Save security codes.
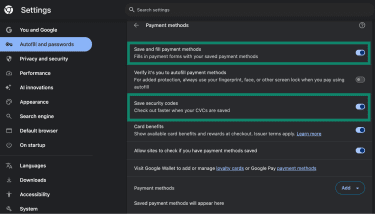
Since payment data is sensitive, Chrome also gives you an option to perform a biometric check before filling in any details on supported devices. You can enable this by clicking the toggle next to Verify it’s you to autofill payment methods.
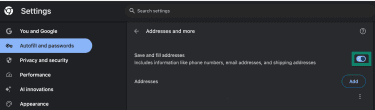
How to enable autofill for addresses and more
Address autofill in Chrome lets you store and reuse contact details like name, email, and shipping information.
- Click Addresses and more in the Autofill and passwords tab in Chrome settings.
- Toggle on Save and fill addresses.
Managing autofill entries on desktop
Go to Chrome settings > Autofill and passwords tab, then open the relevant autofill section and follow these steps for each section.
For passwords and login data
How to add passwords
To add new login details:
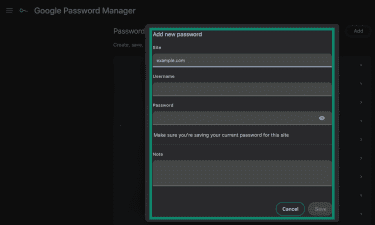
- Go to the Google Password Manager page, then click Add.

- Enter the site URL, username, and password. You can also add secondary usernames, IDs, account numbers, or security questions under the Note field. Once you’ve entered the details, click Save.
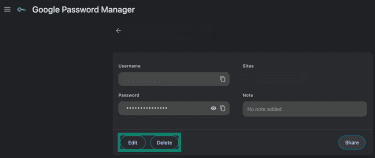
How to edit or delete passwords
To delete or update an already saved record:
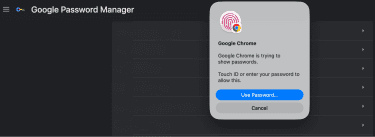
- Click the credentials you want to change and provide authentication via biometrics (if set up). This opens that specific entry.
- If you want to delete this record, click Delete. To update it, click Edit and enter the updated credentials (username or password for the site).
For payment methods
How to add payment methods
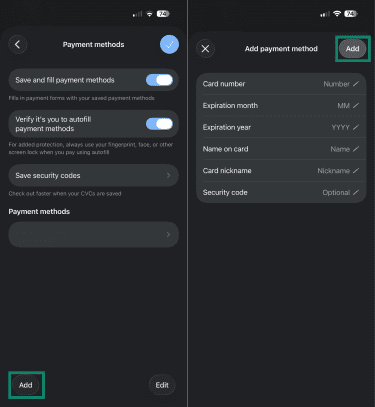
To add payment methods:
- Go to Payment methods, then click Add. You’ll see two options: Credit/Debit card and IBAN (in some regions).
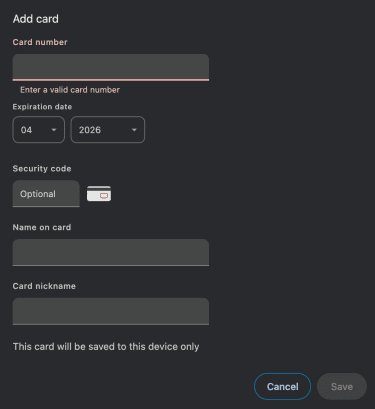
- Choose Credit/Debit card if you want to save your card details for faster checkout and online purchases. Enter your card number, expiry date, name, and security code (optional), then click Save to add the entry.
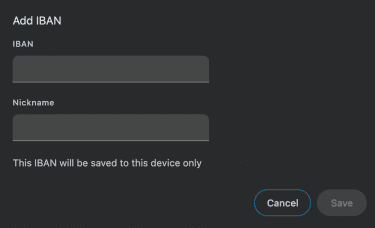
- Choose IBAN if you want to save a bank account number for direct bank transfers. Enter an IBAN, give it a nickname, and click Save.
- Choose Credit/Debit card if you want to save your card details for faster checkout and online purchases. Enter your card number, expiry date, name, and security code (optional), then click Save to add the entry.
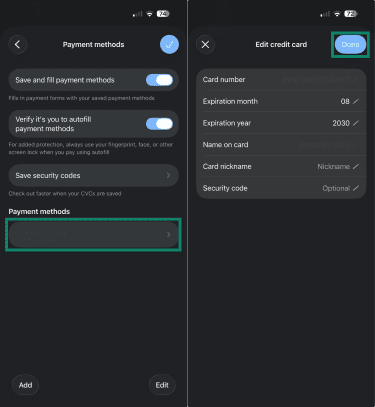
How to edit or delete payment methods
If you want to update or delete a previously saved payment method:
- Click the three horizontal dots beside the entry.
- Click Edit to update the records or Delete to remove the entry. If you clicked Delete, a confirmation box will appear. Select Delete again to confirm the action.

For addresses
How to add addresses
To add an address on Chrome autofill:
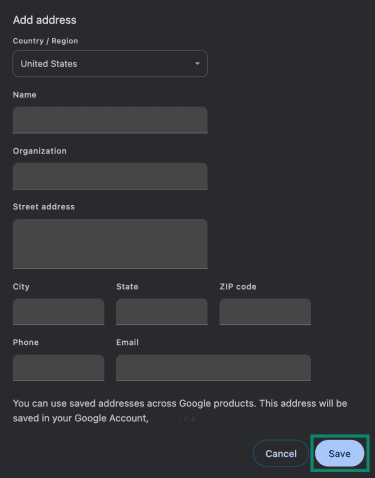
- Click Addresses and more in the Autofill and passwords section.
- Click Add beside the Addresses field.

- Enter the details and click Save.
How to edit or delete addresses
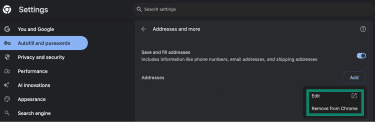
To update an existing address record:
- Click the three horizontal dots beside the entry you want to update, then click Edit or Remove from Chrome. The Remove from Chrome button will delete the saved address.
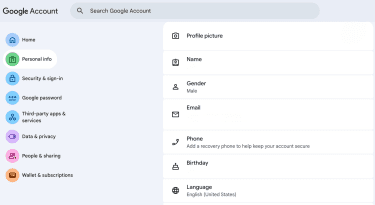
- Clicking Edit typically takes you to your Google Account’s Personal info page, where you can make the respective changes in your profile, including addresses.
How to edit autofill data on mobile
The method for editing autofill data on Chrome is the same on iOS and Android; only the UI looks a little different. For the following guides, we use iOS screenshots.
For passwords and login data
How to add passwords
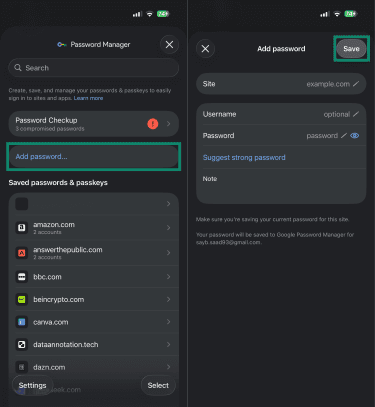
To add sign-in credentials to autofill in Chrome on your phone:
- Open the Chrome app, navigate to Settings (three horizontal dots on the bottom-right), and tap Password Manager.
- Tap Add password, then enter the site URL, username, and password. Tap Save to add the entry. You can also use the Suggest strong password option, which auto-generates a strong password for you.
How to edit or delete passwords
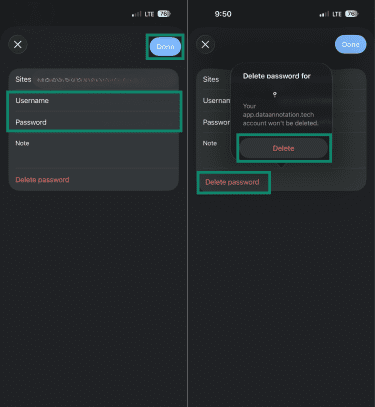
To update or delete a login record on your Chrome mobile browser app:
- Tap the entry you want to change, then tap Edit.
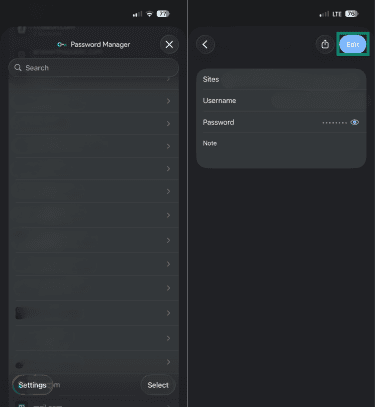
- If you want to update the record, make changes directly in the Username and Password fields and tap Done. To delete the record, tap Delete password. Tap Delete again in the confirmation prompt.
For payment methods
How to add payment methods
To add a payment method on your Chrome mobile app.
- Go to Payment methods, tap Add, and fill out your card details on the page that opens.
- Once done, tap Add on the top-right to save the record.
How to edit or delete payment methods
If you want to make changes to an existing record:
- Tap the record and complete biometric verification (if enabled).
- Tap Edit and make changes to the record, then tap Done to update the entry.
To delete a payment method on Android, tap the entry and then Delete at the top. However, if your payment method is saved in Google Pay, you may need to edit or delete it in Google Pay. On an iPhone, at the bottom right, tap Edit, select the entry, and tap Delete.
How to turn off Chrome autofill
You can disable autofill in the same settings where you enabled it: just toggle off each option that was turned on.
Note: When you turn these settings off, Chrome stops saving new data and stops automatically filling forms with existing entries, but it doesn’t remove any stored data. This is useful if you want to move browser-stored logins into a new password manager.
How to turn off autofill for a specific website
Chrome doesn’t have a built-in option to turn off autofill for a specific website. The only exception is passwords: if you decline to save a password for a site, Chrome adds it to a "never save" list. To manage this, go to Autofill and passwords > Google Password Manager > Settings, and look for Declined sites and apps.
For addresses and payment methods, there is no per-site control. Your only options are to turn off autofill entirely for that category or to fill those fields manually on sites where you don't want autofill to apply.
How to clear autofill data on Chrome
Clearing autofill data removes stored entries such as addresses and payment methods. Passwords are managed separately.
Clearing autofill data on desktop
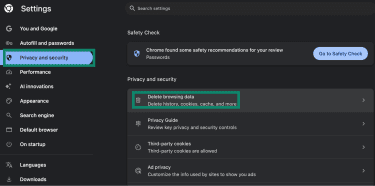
To remove your autofill data on Chrome, follow these steps:
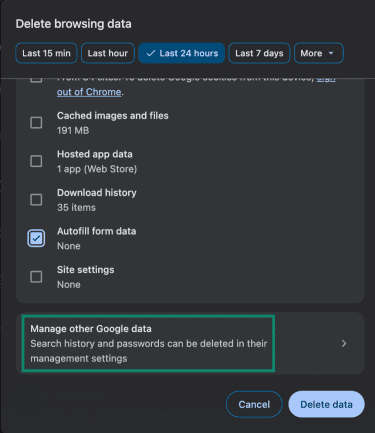
- Open Chrome Settings, go to the Privacy and security tab, and click Delete browsing data.
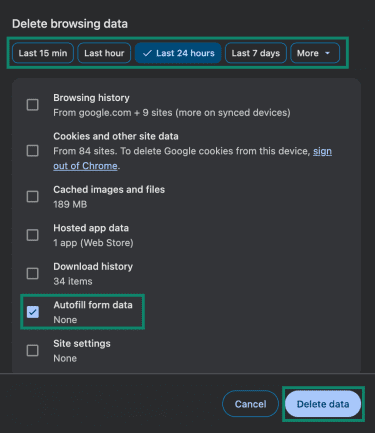
- Check the Autofill form data box and choose a time range. Click Delete data.
Removing autofill entries won’t delete your saved login credentials. To delete your saved passwords:
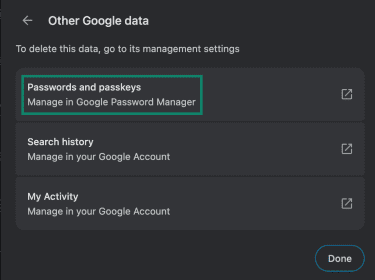
- Click Manage other Google data in the same Delete browsing data page.
- Click Passwords and passkeys. This will take you to Google Password Manager, where you can find saved passwords and manage your login records.
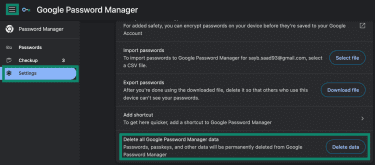
- Click the three horizontal lines and go to Settings on the Google Password Manager page. Scroll down to find Delete all Google Password Manager data, then click the Delete data button beside it.
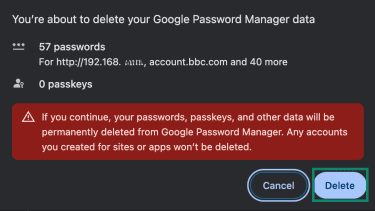
- In the confirmation box that appears, click Delete.
Clearing autofill data on mobile
Chrome doesn’t offer a single option to clear all autofill data on mobile. You can delete saved passwords in bulk through Google Password Manager, but addresses and payment methods need to be removed individually or on a desktop with sync enabled.
To clear all your passwords on mobile:
- In Password Manager, tap Settings, then Delete all data on the next page.
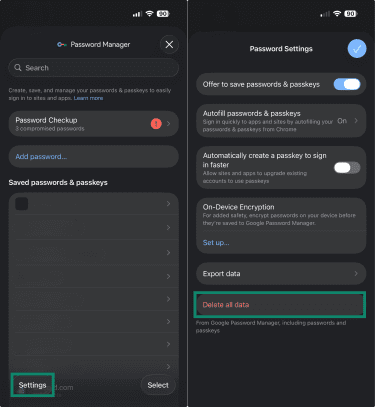
- Tap Delete again in the confirmation prompt.
Common reasons autofill stops working
Autofill can stop working for a variety of reasons, from misconfigured settings to how the form is structured. Common causes include:
- Autofill settings are turned off for passwords, payment methods, or addresses.
- You’re using a different Chrome profile or Google Account than the one that holds the saved data.
- The saved entry doesn’t exist or is incomplete.
- Chrome may not detect certain fields in the form, which stops autofill from working.
- On mobile, the device uses a different autofill provider instead of Chrome/Google.
How to fix autofill issues on desktop
Start by confirming the basics already covered earlier, such as enabled autofill settings, available saved data, and the correct Chrome profile. If those checks don’t resolve the issue, focus on how Chrome interacts with the page itself.
- Test autofill on a different website to determine whether the issue is limited to one form or affects Chrome more broadly, since site-level data like cache and cookies can sometimes affect how pages behave.
- If autofill only fails on a specific site, the issue may be with how that site’s form is built. Chrome relies on recognizable field labels and structure, so it may not offer autofill on pages that use nonstandard or custom input fields.
- For sign-in pages, use Chrome’s password suggestions manually if they don’t appear automatically, since Chrome may not always surface saved credentials even when they exist.
How to fix autofill issues on mobile
Follow the same checks outlined for desktop first. If those basics are already in place and autofill still fails on mobile, check which autofill service your device is using. If another provider is active, it can override Chrome and prevent it from suggesting or filling data.
On mobile, websites often use custom input fields, scripts, or layouts that behave differently from standard desktop forms. Chrome autofill depends on recognizing fields like email, address, or card number. If a site doesn’t label or structure those fields in a standard way, Chrome may not trigger autofill at all.
FAQ: Common questions about Chrome autofill settings
Does Chrome autofill save credit card details?
Can Chrome autofill sync across devices?
How do I stop Chrome from suggesting old form entries?
Why does Chrome autofill show the wrong information?
Can I use Chrome autofill without saving passwords?
Will clearing browser data remove autofill information?
How do I update my autofill address after moving?
What should I do if autofill keeps filling in the wrong field?
Take the first step to protect yourself online. Try ExpressVPN risk-free.
Get ExpressVPN