Ultimate guide to Android privacy settings for enhanced security


Android devices usually store a wide range of personal information, and that data can be put at risk if apps and connections get more access than they need.
Fortunately, Android includes many built-in privacy and security features that let you limit data collection. This guide simplifies the process by outlining essential privacy features and providing step-by-step instructions for using them.
Note: This guide was created using a Samsung Galaxy S21 FE 5G. Labels and locations for settings may differ depending on your device.
What are privacy settings on Android?
Android privacy settings are a set of built-in controls that let you decide what information your phone shares and with whom. These settings come in two forms: device-level controls and Google controls.
Device-level controls limit what installed apps can collect and access, such as your microphone, camera, and location. Google account controls cover ad personalization, account security, and cloud-stored data like browsing history, Google Maps timelines, and YouTube searches.
Learn more: Why removing your data from Google is only half the battle
Why they matter today
Android devices can store a wide range of personal data, depending on your settings and how you use them. Research by NowSecure analyzing thousands of mobile apps found that about 70% of Android apps contained both sensitive data and tracking domains, meaning they handled personal information while also communicating with third-party tracking services.
Many apps also request permissions that allow access to sensors and personal data, such as the camera, microphone, or location. Once granted, those permissions can enable apps to collect information beyond their core functionality.
Managing your Android privacy settings helps limit unnecessary access to sensitive data. By reviewing permissions and adjusting system controls, you can decide what information apps are allowed to collect and how it is used.
Where to find the privacy settings on Android
Android offers many built-in privacy settings, which you can access through the Settings menu. The steps below show how to access the menu and outline the main privacy tabs you can access:
- Find the Settings app on your phone and tap it to open the menu.
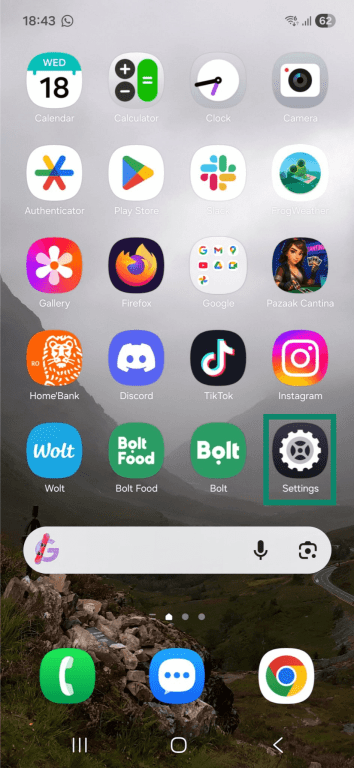
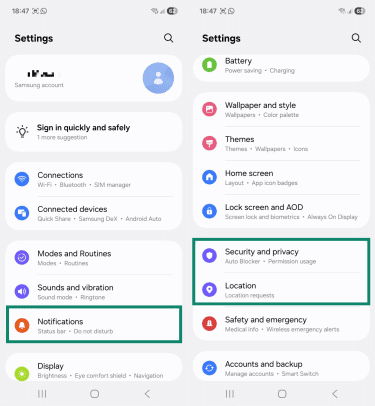
- In the Settings menu, you can access the following options to modify your phone’s main privacy settings:
- Notifications: Change how app notifications behave.
- Security and privacy: Adjusts built-in security and privacy settings.
- Location: Review location permissions and limit the collection of real-time location details.
Key Android phone privacy settings to adjust
The main Android privacy controls to review include app permissions, location settings, privacy features, lock screen and notification settings, and ad-related options.
Optimal app permissions
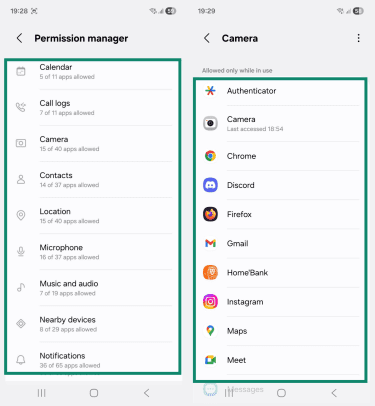
Android's Permission Manager gives you a centralized view of all your permissions in one place, organized by category rather than by app. This makes it easy to spot which apps have access to something sensitive, like your microphone or location, without having to check each one individually.
For each permission, Android gives you a few options, which can include: Allow all the time, Allow only while using the app, or Don't allow. The right choice depends on the app and how you use it.
You might consider only allowing a social media app to access your camera if you use it, or allowing navigation apps to always use your location, as they need it in the background. However, if an app has no clear reason to access permissions, you might consider blocking it entirely.
To change app permissions on Android, follow these steps:
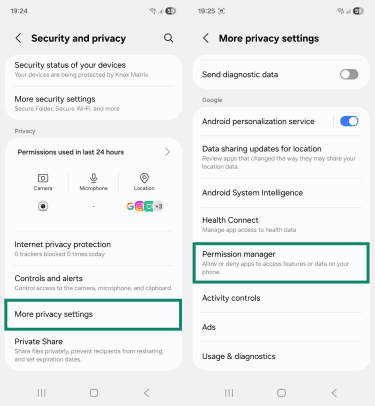
- Head to Settings > Security and privacy, scroll down and select More privacy settings, then tap Permission manager.
- Next, select the desired permission category, then choose which app you want to review.
Tip: If system apps are cluttering the list, tap the three-dot menu icon at the top right and select Hide system.
- From here, choose the type of access you want the app to have:
- Allow all the time: The app can access this permission at any time, including when it’s running in the background.
- Allow only while using the app: The app can access the permission only when it’s actively open and on your screen.
- Don’t allow: The app can’t access that feature or data at all.

Camera and microphone controls
If you don't use any apps that require camera or microphone access, you can disable both at the system level in one tap rather than managing them app by app. Keep in mind that this will affect all apps, so if you use social media apps like Instagram or TikTok, you'll need to re-enable access whenever you want to record or go live.
To do so, follow these steps:
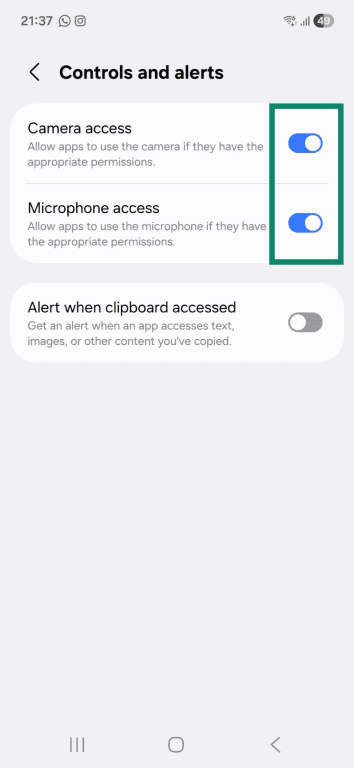
- Head to Settings > Security and privacy, scroll down, and tap Controls and alerts.
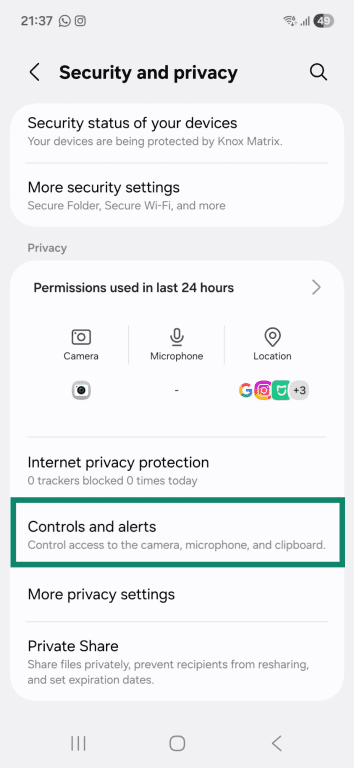
- To disable access, tap the toggles for Camera access and Microphone access. If prompted, tap Block to confirm your decision.
Location privacy
Android gives you several ways to limit how apps access your location. You can turn off location access entirely, restrict it on a per-app basis, or switch from precise to approximate location, which shares a general area rather than your exact GPS coordinates. For most apps, approximate location is more than sufficient.
To adjust location-related privacy settings, do the following:
- Go to Settings > Location. To completely turn off location tracking, tap the on/off toggle in the top right. This prevents all apps from using your location, meaning some features might stop working. To keep location tracking enabled but reduce it to a certain extent, follow the next steps.
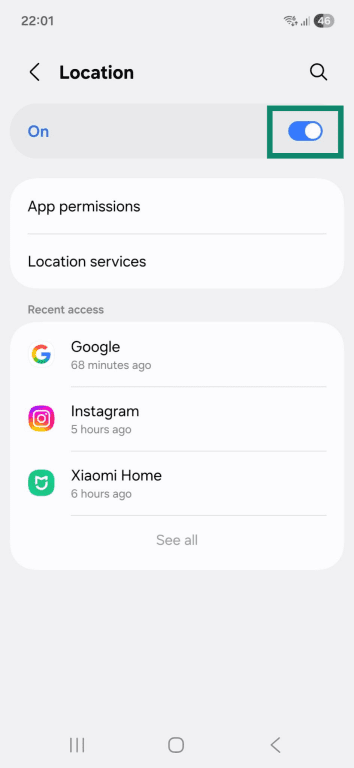
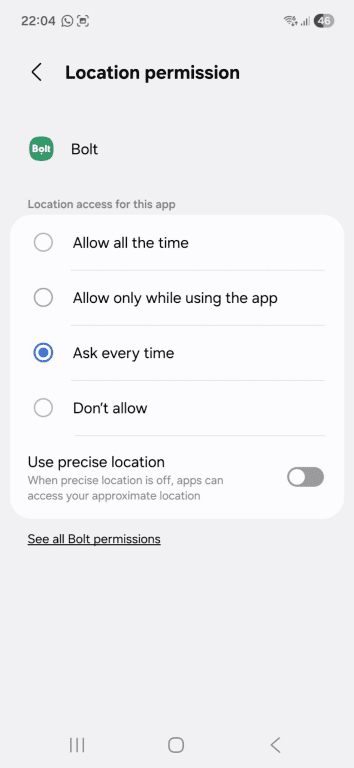
- To limit location-based permissions, select App permissions and choose an app.
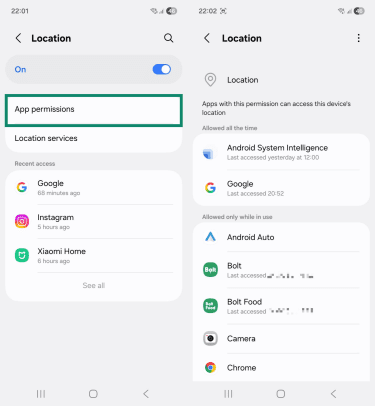
- Select the level of location permissions you prefer. If you’d also like the app to only access your approximate coordinates instead of your exact location, turn off Use precise location.
- Next, head back to the Location tab, select Location Accuracy, and slide the toggle to the off position. This prevents Wi-Fi access points and cellular towers from helping pinpoint your location, so only your phone’s GPS and sensors are used.
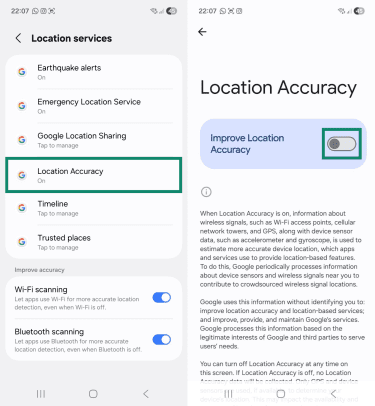
- Go back to the Location services tab and disable Wi-Fi scanning and Bluetooth scanning. Otherwise, apps can use Wi-Fi and Bluetooth to detect your location, even if these settings are turned off.

Internet privacy protection (Samsung Android only)
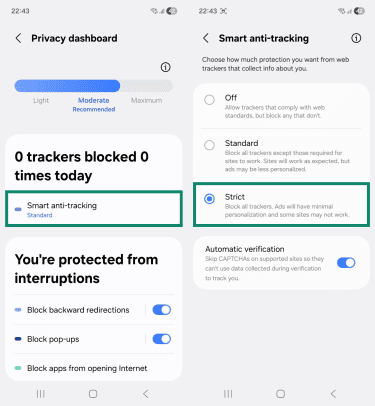
Samsung devices include a built-in Internet privacy protection that includes features to reduce pop-ups while browsing, block unwanted redirects when you use the back button, and warn you about potentially malicious sites. These tools also guard against trackers that record your online activity to build a profile of your behavior, often for advertising purposes.
By default, Samsung blocks most trackers except those required for websites to function. Switching to Strict mode blocks all trackers, though some sites may not work properly as a result. To enable Strict mode, follow these steps:
- Go to Settings > Security and privacy and select Internet privacy protection.
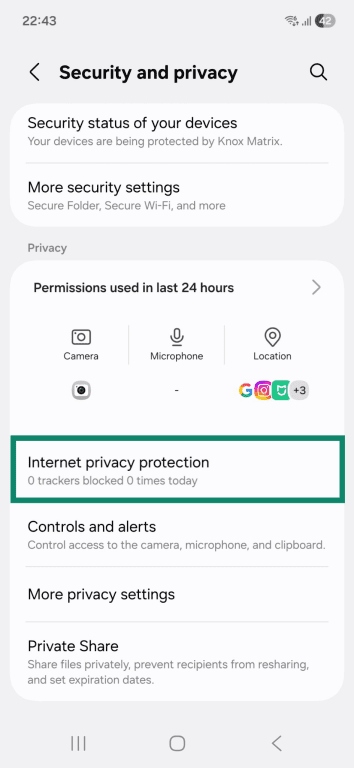
- Next, tap Smart anti-tracking and choose the Strict option.
Lock screen and notification privacy
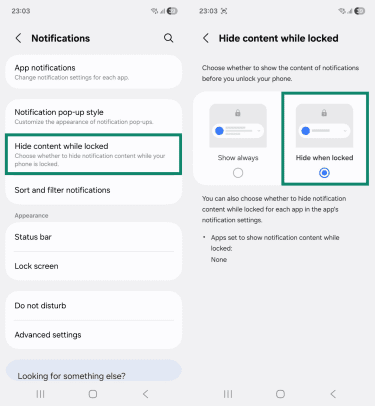
By default, many Android devices display the full content of incoming notifications on the lock screen, meaning messages, emails, and app alerts can be read without unlocking your phone. This leaves you vulnerable to shoulder surfing, where someone nearby can read your screen without your knowledge.
Android gives you two options: hide the content of notifications while keeping them visible, or remove them from the lock screen entirely. The first option lets you know a notification arrived without revealing what it says. The second removes all traces until you unlock your device.
Here’s how to access these features:
- Open the Settings app and tap Notifications. Now, select Hide content while locked, then choose the Hide when locked option. This keeps notification content hidden until you unlock your phone.
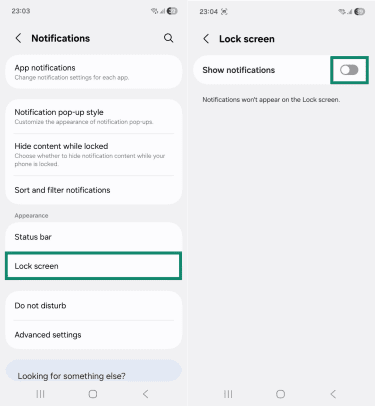
- To also prevent notifications from showing on your lock screen, go back to the Notifications tab, select Lock screen, and switch Show notifications to the off position.
Ads and device identifiers
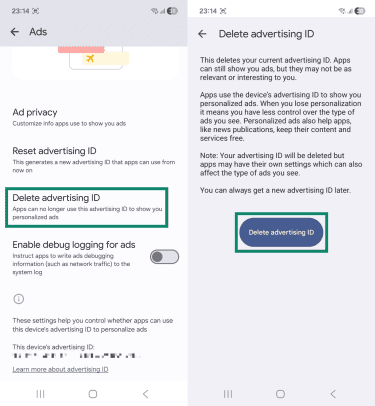
Android assigns your device a unique advertising ID, which is a persistent identifier that apps use to track your behavior across different services and serve you targeted ads. You can limit how this ID is used or delete it entirely, which makes it significantly harder for apps to serve you personalized ads.
Android also lets you control three specific ad-related settings: which topics apps can use to target you, whether apps can share data with each other to suggest ads, and whether Android shares data with advertisers to measure how well their ads perform.
To make changes, follow these steps:
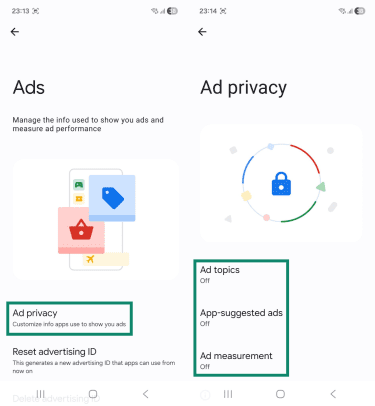
- Head to Settings > Security and privacy > More privacy settings and select Ads.

- Next, tap Ad privacy and select and disable the following settings:
- Ad topics: Stops apps from using topics of interest to deliver targeted ads.
- App-suggested ads: Prevents apps from determining what you like and suggesting ads on other applications.
- Ad measurement: Stops Android from sharing limited types of data with advertisers to measure ad performance.
- Now, go back to the main Ads page, scroll down, select Delete advertising ID, and tap the confirmation button. Doing this prevents apps from using the unique ID, which may result in you seeing fewer personalized ads.
Managing Google privacy settings on your Android device
If you sign into your Google account on your Android device, Google collects data from your device across its services, such as your searches, the places you visit, the videos you watch, and more. Google uses this data not only to personalize your experience but also to display targeted ads.
The good news is Android gives you direct access to your Google account privacy controls from your device settings, so you can limit what gets collected and stored without needing to open a browser.
Google account activity controls
Google tracks your activity across its services through three separate logs, each recording a different type of data. Turning them off doesn’t delete existing data, but reduces what Google stores about your daily habits and limits the data available for ad targeting.
To reduce activity tracking for your Google account, do the following:
- Head to Settings > Security and privacy > More privacy settings, tap Activity controls, and select your Google account.
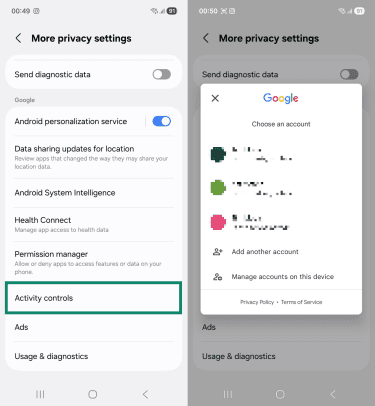
- Turn off the following settings and make sure to check all active subsettings:
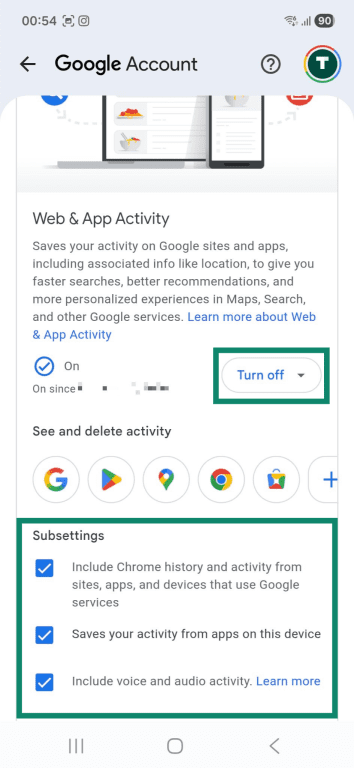
- Web & App Activity: Stops Google from collecting your searches, interactions with Google partners, and associated data, like language and location.
- Timeline: Prevents the logging of new timeline data, such as visits, routes, or trips.
- YouTube History: Prevents Google from saving your YouTube history, including watched videos and search entries.
Ad personalization and topics
Even with activity controls turned off, Google may still use your data to serve personalized ads across its services and partner sites unless you explicitly disable ad personalization. Turning this off won't reduce the number of ads you see, but it will make them significantly less targeted.
To limit personalized ads on Google services and partner sites, follow these steps:
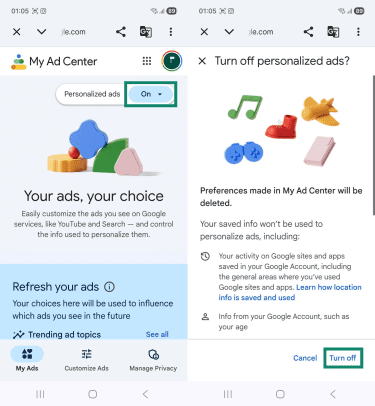
- Go to Settings > Security and privacy > More privacy settings > Activity controls, select your Google account, scroll down to Personalized ads, and tap My Ad Center.
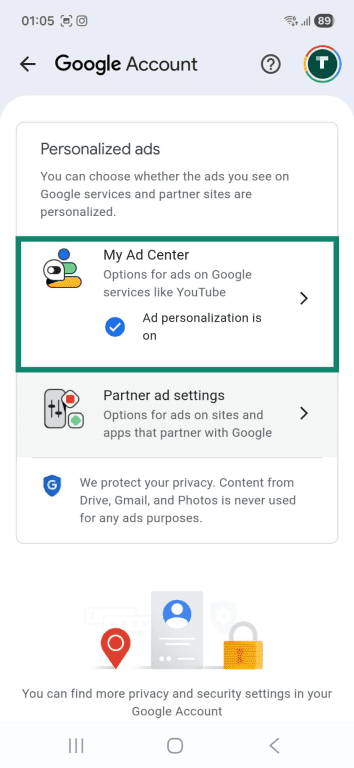
- Now, select the On button, then tap Turn off. Disabling this option also turns off partner ad settings.
Downloading or deleting your Google data
Google allows you to download a copy of your data at any time, whether you’re planning to delete your account or simply want a backup for your own records. Using Google Takeout, you can export information such as emails, photos, documents, search history, and other account data.
If you’re considering deleting your Google account entirely, it’s recommended to download your data first, as once an account is deleted, the data associated with it can’t be recovered.
Here’s how to do that:
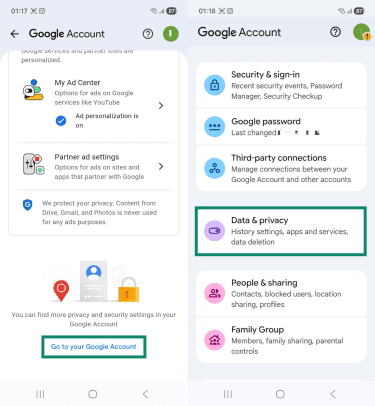
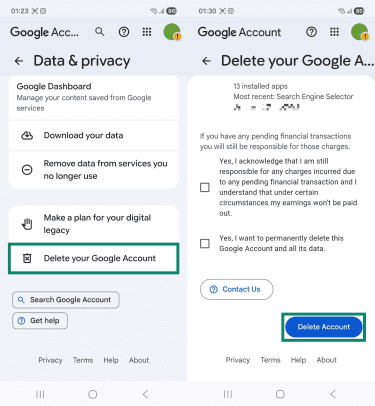
- Access Settings > Security and privacy > More privacy settings > Activity controls, pick your Google account, scroll to the bottom, select Go to your Google Account, and then tap Data & privacy.
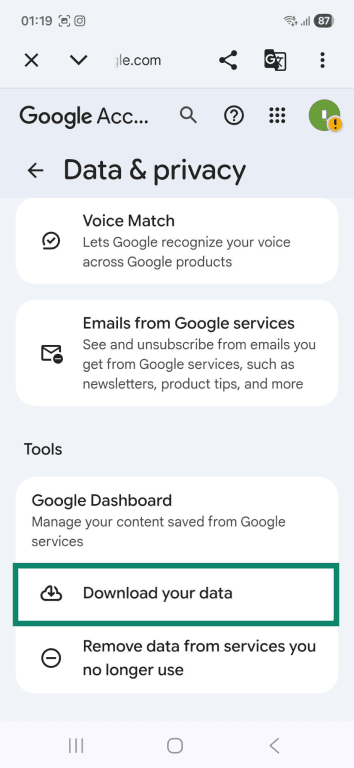
- Head to the Tools section and tap Download your data.
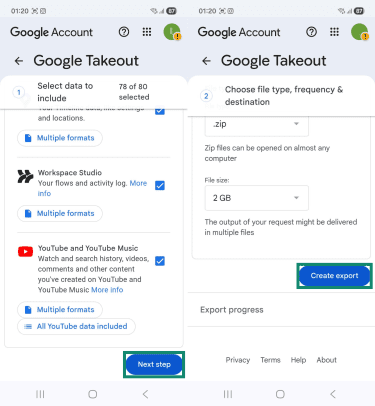
- Select what information you want to save, tap Next step, pick the file type, size, and destination, and select Create export.
- After you receive the requested data, head back to the Data & privacy section, scroll to the bottom, and select Delete your Google Account. Verify your identity, read through and agree to any terms that apply, and tap Delete Account.
Advanced privacy and security enhancements
If you want to further strengthen your mobile security and privacy, you can adjust additional built-in controls on your Android phone and consider installing trusted security tools. The sections below outline other measures you can take.
Two-factor authentication (2FA)
2FA acts as a second line of defense for your Google account, after your password, by requiring an additional identity check before granting access. Even if someone has your password, they won't be able to log in without also passing the second verification step.
If you haven’t set up 2FA for your Google account yet, you can do it directly from your Android phone if the account is linked to the device. Here’s how to do this:
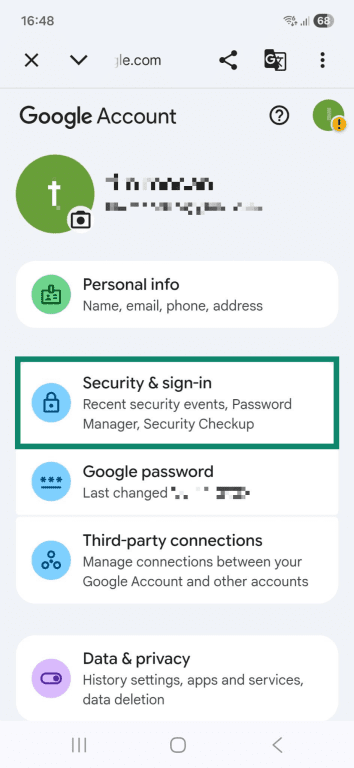
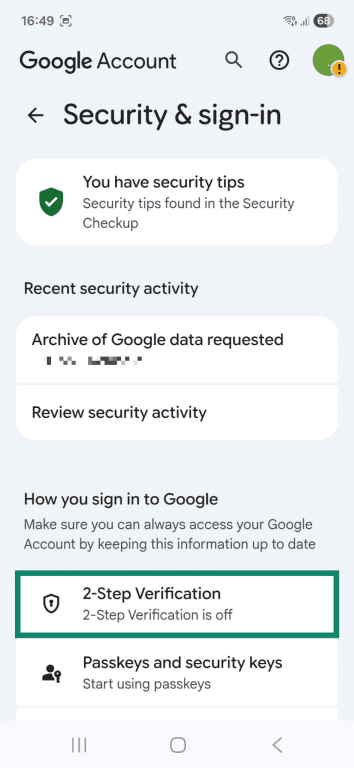
- Access Settings > Security and privacy > More privacy settings > Activity controls and select your Google account. Then, scroll down, tap Go to your Google Account, and then select Security & sign-in.
- Next, tap 2-Step Verification and confirm your identity if asked to.
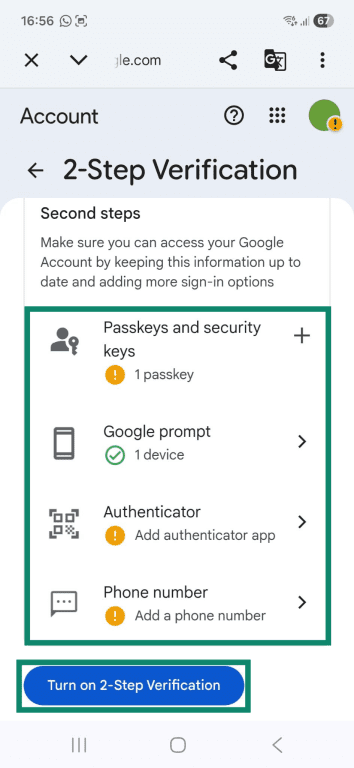
- Add a 2FA method and select Turn on 2-Step Verification when you’re done. Supported options include:
- Passkeys and security keys: Sign into your account using a fingerprint or face scan, screen lock, or hardware security key.
- Google prompt: Log in using your phone by tapping a push notification.
- Authenticator: Verify your identity with unique, time-sensitive codes generated by an authenticator app.
- Phone number: Log into your account using sign-in codes received through text messages.
Google Play Protect and app safety
Google Play Protect is a built-in security feature that checks Play Store apps before you download them to ensure the software isn’t harmful or malicious. It also monitors your installed apps for suspicious behavior. If it detects a risk, it sends alerts and may disable the app.
It's enabled by default, but it's worth confirming it's active by following these steps:
- Open the Google Play Store app and tap your profile icon in the top right.
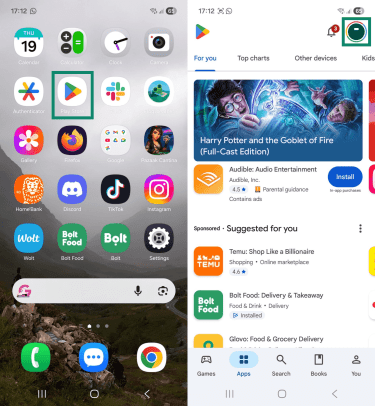
- Select Play Protect and tap the settings icon.

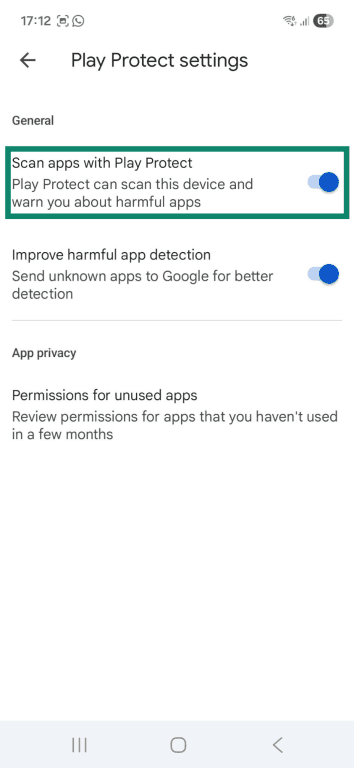
- Make sure that the Scan apps with Play Protect toggle is turned on.
Lost or stolen device protection
Android phones offer built-in lost device protection, which includes settings that help you find a lost phone using the Google Find Hub app or online service, lock it remotely, and protect your data from being accessed.
To adjust these security settings, follow these steps:
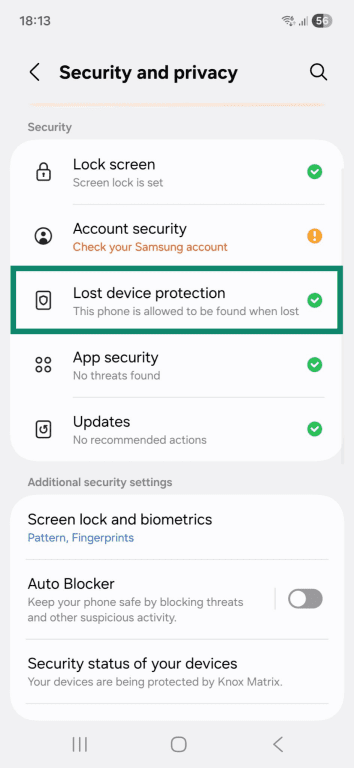
- Open the Settings app, tap Security and privacy, and select Lost device protection.
- First, tap Find My Mobile and make sure all settings are enabled.
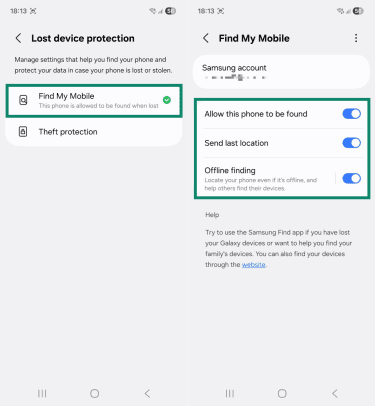
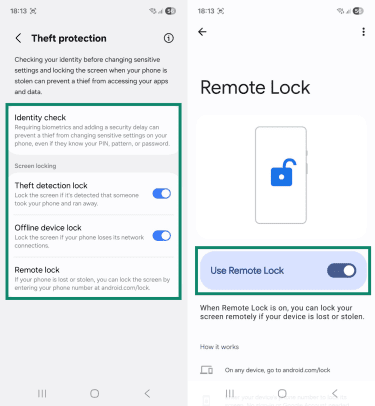
- After that, access Theft protection and turn on all features:
- Identity check: Require biometric authentication for access to sensitive settings.
- Theft detection lock: Locks your phone if its motion sensors detect that someone abruptly took your device.
- Offline device lock: Automatically locks your phone if internet access is off for a while.
- Remote lock: Lets you remotely lock the screen by entering your phone number in Google Find Hub.
Private Domain Name System (DNS) and browser privacy
Android Private DNS is a built-in feature that encrypts DNS lookups, which translate domain names to IP addresses. It essentially makes it very difficult for third parties, like your internet service provider (ISP), to see which websites you look up, providing enhanced privacy. This feature is sometimes enabled by default and automatically uses recommended DNS servers, but you can also manually configure your phone to use a trusted third-party service.
Additionally, consider using your browser’s incognito mode when browsing sensitive or personal topics. Incognito mode is a feature in most modern browsers that creates a session where your browsing history isn’t saved. This ensures that other people who have access to your phone can’t see your past searches.
When to use a VPN
A virtual private network (VPN) is an online service that changes your device’s IP address and encrypts your online traffic to protect your data on unsecured public networks or make it harder for your ISP to monitor your browsing traffic. Some VPNs, like ExpressVPN, also include additional tools that protect your digital privacy, like a malicious tracker blocker and an ad blocker.
Practical tips to ensure continuous privacy
Protecting your privacy on Android is an ongoing process, not a one-time setup. Small habits like separating profiles, updating apps, and reviewing permissions can make a big difference over time.
Use guest mode or work profiles
Some Android devices allow you to create separate user profiles so you can share your phone with family or friends without compromising your privacy. Users don't share files, messages, and apps because a guest profile has its own storage space.
Additionally, devices running Android 5 or later support work profiles, which separate work-related apps and data from personal services and information. This lets you use the same device for both work and personal tasks while keeping your data separate and protected. To create a work profile, you need to speak with your employer, as you’ll need a code from your IT admin to finish the setup.
Keep apps updated and remove unused apps
Along with keeping your Android device up to date, make sure all installed apps are updated to the latest version. Outdated apps can create security gaps that attackers may exploit to compromise your phone and data. Also, consider removing apps you no longer use. Unused apps take up space and may stop receiving security updates, which can put your information at risk.
Review permissions regularly
Even if you adjust app permissions now, it’s simple to lose track of them as you install more services in the future. Consider setting a reminder to review app permissions regularly so apps only have access to the data they need. Do this every few months or as often as you feel comfortable to stay on top of privacy risks.
FAQ: Common questions about Android privacy settings
How do I make everything private on my phone?
How to find hidden settings in Android?
Is my Android phone being spied on?
What permissions should I limit for better privacy?
How can I enable two-factor authentication (2FA)?
How do app permissions work on Android devices?
What is the best way to protect my personal data?
Are there any recommended privacy apps for Android?
Take the first step to protect yourself online. Try ExpressVPN risk-free.
Get ExpressVPN


Comments
What the hell did I land on...